Vail Adapter User Manual
Complete guide to operating your Vail CW Adapter and Button Hat accessory
Introduction
Welcome & Purpose
Welcome to your Vail Adapter! This manual covers setup, operation, and troubleshooting for your USB Morse code interface device. The adapter connects traditional Morse code keys to modern digital tools, and it works just as well for beginners learning CW as for experienced operators.
What is the Vail Adapter?
The Vail Adapter is a USB interface device that connects physical Morse code keys to computers and mobile devices. It features:
- Zero-delay sidetone - Immediate audio feedback for natural keying
- Multiple operating modes - MIDI, Keyboard, and Radio modes
- Universal compatibility - Works with web-based training tools, desktop applications, and physical radios
- Built-in practice oscillator - Practice anywhere with just a USB power source
Which Model Do You Have?
Basic Model Features
- USB connection for computer/mobile device connectivity
- Built-in piezo buzzer for audio feedback (sidetone)
- 3.5mm headphone jack that automatically mutes the buzzer when headphones are plugged in
- Input port for connecting a physical Morse code key
- Perfect for practice and training with digital tools
Advanced Model Features
- All features of the Basic model
- Additional 3.5mm output port to connect directly to a radio for on-air operation
- Two capacitive touch points that function as a built-in key
- Can operate as a standalone radio keyer without a computer
- Includes adapter keyer mode and radio keyer mode
Three-Button Add-on (Optional)
The Button Hat is an optional accessory board that works with both Basic and Advanced models:
- Three physical buttons for adjusting settings without software
- Adjust sidetone frequency, keying speed, and key type
- CW memory recording and playback capability (up to 3 memories, 25 seconds each)
- Useful for contesting, Parks on the Air (POTA), and repetitive exchanges
Getting Started
🎯 New to the Vail Adapter?
Check out our new Interactive Getting Started Guide! This step-by-step wizard will walk you through setting up your adapter, detecting it with Web MIDI, configuring settings in real-time, and testing everything works. Perfect for first-time users!
What You'll Need
Basic Model Requirements
- The Vail Adapter (Basic model)
- A USB data cable (not just a charging cable - must support data transfer)
- A physical CW key (straight key, iambic paddle, or other Morse key)
- Computer or mobile device with USB port
- Optional: headphones with 3.5mm plug for private listening
Advanced Model Requirements
- The Vail Adapter (Advanced model)
- A USB data cable (must support data transfer)
- Optional: A physical CW key (the Advanced model has built-in capacitive touch points)
- Computer or mobile device with USB port
- Optional: 3.5mm two-channel cable for connecting to a radio
- Optional: headphones with 3.5mm plug
First-Time Setup
Flashing Firmware
Your adapter already has the latest firmware installed. Skip to Initial Configuration below.
If you built your adapter from independently sourced parts, you must flash the Arduino firmware before first use:
- Visit https://update.vailadapter.com/
- Follow the on-screen instructions
- This step is critical - the adapter will not function without proper firmware
Initial Configuration via vailmorse.com
After hardware setup, configure your operating preferences:
- Visit vailmorse.com in your web browser
- Plug in your Vail Adapter - the website will detect it and enter MIDI mode automatically
- Set key type: Choose straight key, iambic paddle (mode A or B), or other supported types
- Set speed: Choose your keying speed in words per minute (WPM)
- Beginners: 5-15 WPM
- Intermediate: 15-25 WPM
- Experienced: 25-40+ WPM
- Set sidetone frequency: Choose the audio tone frequency (typically 400-800 Hz, common choices are 600 Hz or 700 Hz)
Understanding Operating Modes
MIDI Mode
What it is
In MIDI mode, the adapter sends key presses as MIDI note messages. This provides precise timing and direct hardware communication.
When it activates
- Automatically activates when vailmorse.com is open in your browser
- Also activates when other MIDI-compatible programs detect the adapter
- You don't manually switch to MIDI mode - it happens automatically
What it's used for
- Initial configuration and settings adjustment (vailmorse.com)
- Online CW practice and QSOs on the vailmorse.com repeater
- Any application specifically designed to work with MIDI keying input
- Button functions for the three-button add-on (if installed)
Keyboard Mode
What it is
In keyboard mode, the adapter simulates keyboard key presses. Key presses appear to your computer as if you typed on your keyboard.
Default behavior
- Keyboard mode is the default when you plug in the adapter
- It will be in keyboard mode unless a MIDI program is actively using it
- Requires no special drivers or software support
Compatible tools
- VBand - Online amateur radio band simulation
- Morse Invaders - Gamified Morse code learning
- Many other keyboard-based training applications
- See vailadapter.com resources for complete list
Switching Between MIDI and Keyboard Modes
Manual mode switching with button hat (if installed)
If you have the optional three-button add-on, you can manually toggle between MIDI and keyboard modes:
- Hold Buttons 1 and 2 together for 2 seconds to switch modes
- You'll hear an audio confirmation when the mode changes
- This allows quick switching without unplugging the adapter
Mode switching without button hat
- If using a MIDI program (like vailmorse.com), close the program or browser tab completely
- Unplug the Vail Adapter from your computer or device
- Wait 2-3 seconds
- Plug the adapter back in
- The adapter will default to keyboard mode
- If vailmorse.com is open in any browser tab, the adapter stays in MIDI mode
- Keyboard-based tools like VBand will not work while the adapter is in MIDI mode
- Symptom: You press your key but nothing happens in the keyboard-based application
- Solution: Close ALL MIDI programs, then unplug and replug the adapter
Radio Mode (Advanced Model Only)
How to enter radio mode
Radio mode is for using the Advanced model as a standalone radio keyer without a computer:
- Rapidly and repeatedly tap the DAH capacitive touch point on the adapter
- Continue tapping quickly until you hear a change in the tone pattern from the buzzer
- The tone change indicates you've successfully entered radio mode
Adapter Keyer Mode vs Radio Keyer Mode
Once in radio mode, you can toggle between two sub-modes by holding down the DAH capacitive touch point:
| Mode | Confirmation | Description | When to Use |
|---|---|---|---|
| Adapter Keyer Mode | 'K' (dah-dit-dah) | The adapter performs all keying logic internally and sends completed signals to your radio | Radio doesn't have built-in keyer, or you prefer the adapter's keying characteristics |
| Radio Keyer Mode | 'R' (dit-dah-dit) | The adapter passes raw contact closures directly to the radio; your radio's internal keyer handles timing | Your radio has a good built-in keyer you prefer to use |
Basic Operations
Understanding Your Adapter's Ports
Basic Model Ports
The Basic Vail Adapter has ports on both ends:
End 1:
- USB Port - Connect to your computer or mobile device for power and data
End 2 (two 3.5mm jacks):
- Silver Jack - Headphone/speaker output (automatically mutes buzzer when connected)
- Black Jack - Physical key input (connect your straight key, paddle, or other CW key)
Advanced Model Ports
The Advanced Vail Adapter has additional radio connectivity:
End 1 (two ports):
- USB Port - Connect to your computer or mobile device for power and data
- Radio Output (3.5mm jack) - Connect to your radio's key input for on-air operation
End 2 (two 3.5mm jacks):
- Silver Jack - Headphone/speaker output (automatically mutes buzzer when connected)
- Black Jack - Physical key input (connect your straight key, paddle, or other CW key)
Connecting Your Key
Physical key connection
- Locate the key input port on the Vail Adapter (3.5mm jack)
- Plug in your straight key, iambic paddle, or other CW key using the appropriate cable
- Most keys use a standard 3.5mm (1/8") stereo plug or mono plug
- Ensure the connection is secure - a loose connection will cause intermittent operation
Capacitive touch points (Advanced model)
The Advanced model has two metal touch pads on the circuit board:
- To identify the pads: hold the adapter with the speaker hole facing up and the USB port away from you
- DIT pad is on the LEFT side
- DAH pad is on the RIGHT side
- Touch the pads with your fingers to send dits and dahs
- Works like an iambic paddle - touching both simultaneously creates alternating dits and dahs
- Useful when traveling or when a physical key isn't available
Connecting to Computer/Mobile Device
USB connection
- Use a USB data cable (not just a charging cable) to connect the adapter
- Plug the micro-USB or USB-C end into the Vail Adapter
- Plug the USB-A or USB-C end into your computer or mobile device
- The adapter draws power from the USB connection - no separate power supply needed
Device recognition
- Modern computers (Windows, Mac, Linux) and mobile devices should recognize the adapter automatically
- No drivers need to be installed - uses standard USB protocols
- You may see a notification that a new USB device has been connected
- The adapter should appear as a MIDI device and/or keyboard input device
Audio Output
Built-in buzzer
- The Vail Adapter has a piezo buzzer that provides audio feedback (sidetone)
- Every time you press your key, you'll hear a tone at the frequency you configured
- This immediate audio feedback helps you develop proper timing and rhythm
Headphone jack usage
- The adapter includes a 3.5mm headphone jack for private listening
- When you plug headphones in, the buzzer automatically mutes
- The sidetone will only be heard in the headphones, not from the buzzer
- Use any standard headphones or earbuds with a 3.5mm plug
Volume control options
Muting the buzzer
You can disable the onboard buzzer and headphone output if you need silent operation:
- Hold down the DIT paddle (or DIT capacitive touch point on Advanced model) for more than 5 seconds
- You will hear a confirmation tone
- The buzzer and headphone output will be disabled
- To re-enable audio output, unplug and replug the adapter
Using with Online Tools
vailmorse.com (MIDI mode)
- Visit vailmorse.com and plug in your Vail Adapter
- The adapter will automatically switch to MIDI mode
- You can send CW and see what others are sending in real-time
- Also used for initial configuration of speed, key type, and tone
Keyboard-based tools
Compatible keyboard-mode tools include:
- VBand - Band simulation
- Morse Invaders - Game
- Vail Training Tools - Practice tool
- Many more
Advanced Features (Advanced Model)
Radio Output
Cable requirements
- Use a standard 3.5mm stereo (two-channel) cable - the same type used by most iambic paddle keys
- This cable carries the dit and dah contact closures to your radio
- Available from amateur radio equipment suppliers or general electronics retailers
- Cable length depends on your station setup - 3 to 6 feet is typical
Connecting to your radio
- Locate the key input jack on your radio (often labeled "KEY," "PADDLE," or "CW KEY")
- If your radio has a 1/4" jack, use a 3.5mm-to-1/4" adapter
- Plug one end of the cable into the Vail Adapter's output jack
- Plug the other end into your radio's key input jack
- Ensure your radio is set to CW mode before attempting to transmit
Entering radio mode
- Rapidly tap the DAH capacitive touch point multiple times
- To identify the DAH pad: hold the adapter with the speaker hole facing up and the USB port away from you - DAH is on the RIGHT side
- Tap quickly and repeatedly (like a double-click but faster)
- Continue until you hear a distinct change in the tone pattern from the buzzer
- The adapter will remain in radio mode until you exit or power cycle it
Adapter Keyer Mode
What it does
In Adapter Keyer Mode, the Vail Adapter acts as an electronic keyer:
- Takes input from your physical key or capacitive touch points
- Processes the dit and dah inputs according to its stored settings (speed, key type, timing)
- Generates properly timed keying signals
- Sends the completed signals to your radio via the output port
When to use it
- Your radio doesn't have a built-in electronic keyer (older or simpler radios)
- Your radio is configured for straight key input, but you want to use an iambic paddle
- You prefer the timing and feel of the Vail Adapter's keyer over your radio's built-in keyer
- You want consistent keying characteristics across multiple radios
Radio Keyer Mode
What it does
In Radio Keyer Mode, the Vail Adapter passes raw paddle inputs directly to the radio:
- No keying logic is performed by the adapter
- Dit paddle contacts and dah paddle contacts are sent separately to your radio
- Your radio's internal keyer handles all timing, speed, and keying characteristics
- The adapter essentially acts as a "pass-through" for your key
When to use it
- Your radio has a high-quality built-in keyer that you prefer
- You want to use your radio's specific settings (speed, weight, sidetone, etc.)
- You're familiar with your radio's keying feel and don't want to change it
- You want to adjust keying parameters using your radio's controls
Capacitive Touch Operation
Using touchpoints as a key
- To identify the pads: hold the adapter with the speaker hole facing up and the USB port away from you
- DIT pad is on the LEFT side
- DAH pad is on the RIGHT side
- Touch a pad with your finger to send dit or dah
- Touch both pads simultaneously to create alternating dits and dahs (iambic operation)
- Works in all modes: keyboard mode, MIDI mode, and radio mode
- No external key needed - the adapter itself becomes your key
Accessing radio mode features
- Rapidly tap the DAH pad (right side) multiple times to enter radio mode
- Hold the DAH pad for approximately 2 seconds to toggle between Adapter Keyer Mode and Radio Keyer Mode
- These special functions only work when accessing radio mode
- The DIT pad (left side) is used only for sending dits in all modes
Troubleshooting
Adapter Not Recognized by Computer
Reflash firmware instructions
This is the most common solution when the adapter isn't detected by your computer:
- Visit https://update.vailadapter.com/ in your web browser
- Connect your Vail Adapter via USB
- Follow the on-screen instructions to reflash the firmware
- The process typically takes 1-2 minutes
- After reflashing, unplug and replug the adapter
- Your computer should now recognize the device
No Audio from Buzzer
Check if buzzer is muted
- You may have accidentally disabled the buzzer by holding the DIT paddle for 5+ seconds
- To re-enable audio output, unplug and replug the adapter
- You should hear normal sidetone after reconnecting
Check headphone jack
- Verify nothing is plugged into the headphone jack
- The buzzer automatically mutes when headphones are connected
- Even a partially inserted plug can mute the buzzer
- Remove any cables from the headphone jack and try again
Reflash firmware
If the headphone jack is empty and there's still no audio:
- Visit https://update.vailadapter.com/
- Follow the on-screen instructions to reflash
- After reflashing, test audio output by pressing your key
- The buzzer should sound at the frequency you configured
Keys Not Responding
Check mode (MIDI vs Keyboard)
- If using keyboard-based tools (VBand, Morse Invaders): ensure you're in keyboard mode
- Close any MIDI programs like vailmorse.com
- Unplug and replug the adapter to reset to keyboard mode
Verify key connection
- Check that your physical key is securely plugged into the adapter
- Inspect the cable for damage (frayed wires, broken plug)
- Try wiggling the connection - loose connections cause intermittent operation
- If using capacitive touch points (Advanced model), ensure you're touching the pads firmly
- Try a different key if available to rule out key hardware problems
Key Gets Stuck On When Plugging In Straight Key
Change to straight key mode first
If your key gets stuck in the "on" position when you plug in a straight key, follow these steps:
- Visit https://vailmorse.com (the Vail repeater)
- Change the adapter to straight key mode using the repeater settings
- Unplug the USB cable from your adapter
- Plug your straight key into the adapter's key input jack
- Plug the USB cable back into the adapter
- The adapter should now recognize your straight key correctly
Can't Use Keyboard Tools
Close MIDI programs
- Check all browser tabs - vailmorse.com may be open in a background tab
- Close any MIDI-compatible music or audio software
- Check your system tray or task bar for MIDI applications running in the background
Unplug and replug adapter
- After closing all MIDI programs, unplug the Vail Adapter from USB
- Wait 2-3 seconds
- Plug the adapter back in
- The adapter will default to keyboard mode
- Now try your keyboard-based tool (VBand, Morse Invaders, etc.)
Radio Output Not Working
Verify radio mode entry
- Ensure you've successfully entered radio mode on the Advanced model
- Hold the adapter with speaker hole up and USB port away from you
- Rapidly tap the DAH capacitive touch point (RIGHT side) until you hear the tone change
- The adapter must be in radio mode to send signals via the radio output jack
Check cable connection
- Verify the 3.5mm cable is securely plugged into the adapter's output jack
- Check that the other end is plugged into your radio's key input jack
- Inspect the cable for damage
- Try a different cable if available
Verify correct keyer mode
- If using Adapter Keyer Mode ('K'), ensure your radio is set to accept external keying or straight key input
- If using Radio Keyer Mode ('R'), ensure your radio's internal keyer is enabled and configured
- Check your radio's CW mode settings - some radios have multiple CW modes
- Consult your radio's manual for proper keyer configuration
Button Hat Issues
Buttons don't seem to respond
- Make sure you're holding long enough (2 seconds for mode entry)
- Wait for the audio announcement before releasing
- Try a single button at a time first
I'm not hearing any audio feedback
- Check that your piezo buzzer is connected
- Verify you haven't accidentally disabled the buzzer (holding DIT for 5 seconds mutes it). To re-enable, unplug and replug the adapter
Settings don't save
- Make sure you either hold Button 2 for "RR" confirmation
- Or wait for the descending tones (30-second auto-save)
- If you exit accidentally (power loss), changes are NOT saved
I don't know which mode I'm in
- Just wait - if you don't press anything for 30 seconds, you'll auto-exit
- Or try entering a mode - you can always save without changing anything
Maintenance & Updates
Firmware Updates
When to update
- Update when new features are announced on the Vail Discord or GitHub
- Update if you experience unusual behavior or bugs
- Update if you want access to newly released functionality
- Check for updates every few months or when you hear about new capabilities
- Not all updates are critical - read release notes to determine if an update benefits you
How to update
- Visit https://update.vailadapter.com/ in your web browser
- Connect your Vail Adapter via USB
- The site will detect your adapter and show the current firmware version
- Follow the on-screen instructions to flash the latest firmware
- The update process typically takes 1-2 minutes
- Do not unplug the adapter during the update process
- After completion, unplug and replug the adapter to restart it
Checking for New Features
GitHub repository
- The Vail Adapter project is open source and hosted on GitHub
- Visit the repository to see the latest code, release notes, and planned features
- The "Releases" section shows version history and what's new in each update
- The "Issues" section shows reported bugs and feature requests
- You can contribute ideas or report problems via GitHub
Discord community
- Join the Vail Discord server to connect with other users
- New firmware releases are announced in the Discord
- Users share tips, tricks, and creative uses for the adapter
- Get help from experienced users and contributors to the project
- Discuss feature ideas and provide feedback
Resources & Support
Compatible Tools & Websites
Visit vailadapter.com resources for the current list of compatible tools.
MIDI Mode Tools
- Vail Server - Change settings, have QSOs online, practice copying fortunes, or use the Echo feature
Keyboard Mode Tools
- VBand Server - Have QSOs with others online or join group CW parties
- Morse Invaders - Highly addictive game to practice sending and build speed
- Vail Training Tools - Practice sending words or copying QSOs, states, and callsigns
- Morse Code Battleship - Morse code version of the classic game
- Morse Code Checker - Analyzes your Morse code sending quality
- Morse ATC - Air traffic control simulation with Morse code
- Morse-it iOS App - Comprehensive Morse code app for iPad and iPhone
Setting Up MORSE Game on Steam
MORSE is a game for Windows PC available through Steam. This guide shows you how to configure the MORSE game to work with your Vail Adapter.
Initial Configuration Steps
- Configure your key type on vailmorse.com: First, set your preferred key type (straight key, paddle, etc.) using the vailmorse.com website while in MIDI mode
- Close all MIDI applications: Close all browser tabs with vailmorse.com open and any other MIDI applications
- Switch to Keyboard mode: Unplug and replug your Vail Adapter to enter Keyboard mode
- Launch MORSE game: Now you're ready to bind keys in the game as shown below
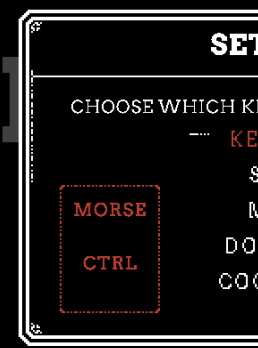
Step 1: Access Settings
At the opening menu, click "Settings"

Step 2: Navigate to Key Binding
In the Settings menu, click "Key Bind"

Step 3: Bind the Morse Key
- Click the red box at the bottom labeled "Morse"
- It should turn white and prompt "PRESS KEY"
- Do not press any keyboard key - instead, press the Dit on your paddle or press your straight key
- The Morse key should change to "CTRL"
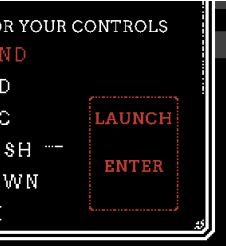
Step 4: Bind the Launch Key
- Click the red box in the lower right to bind a key to the "Launch" command
- It should turn white
- Press any keyboard key to bind to the launch command (e.g., "Space", "Enter", "F")
Step 5: Adjust Dot/Dash Speed
In the same menu, you can set the speed/length of the dit and dash detection the game will use. This should correlate to your sending speed. Adjust the slider between "Fast" and "Slow" to match your operating speed.
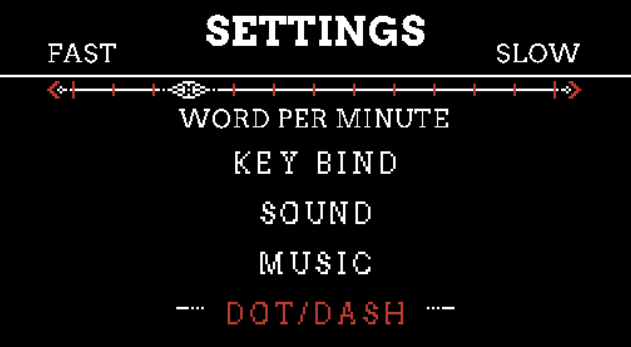
Step 6: Configure Cooldown
The Cooldown setting determines how long after you enter a Morse code sequence it is sent as a command. Generally, the faster you send, the faster you want this setting. It's similar to Farnsworth speed.
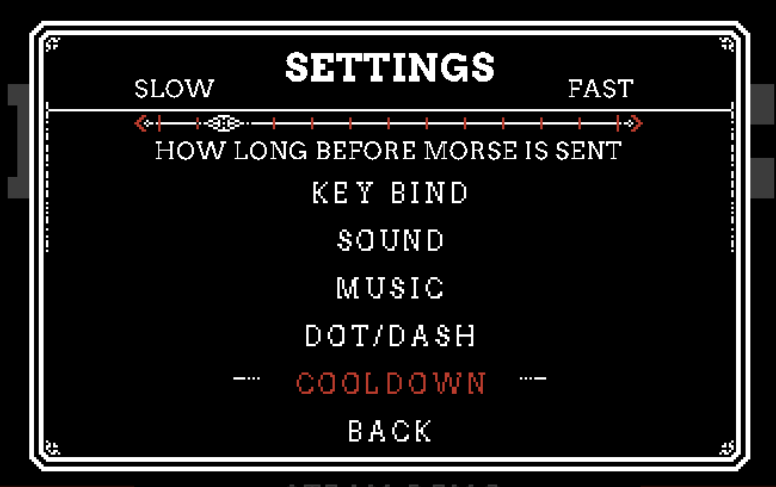
Click "Back" to exit the settings menu.
Starting the Game
Telegraph Key Mode: Always select "Straight Key" mode in the MORSE game settings. This setting must be "Straight Key" regardless of whether you're using a paddle or straight key with your Vail Adapter. The game's key mode is independent of your Vail Adapter's key type configuration - you can use a paddle with the game set to straight key mode!
Difficulty: There are two difficulty levels:
- Amateur - Tutorial mode with guidance
- Telegraphist - No tutorial, face down the Kaiser's fleet

Game Troubleshooting
- If your dashes are getting decoded as dits, the Dot/Dash setting is too long
- If your dits are getting decoded as dashes, the Dot/Dash setting is too short
- If your commands are being sent before finishing a letter, the Cooldown setting is too fast
- If multiple letters or numbers are combining together, the Cooldown setting is too slow
Getting Help
Vail Discord server
- Join the Vail Discord to get support from the community and contributors to the project
- Helpful users can troubleshoot issues and answer questions
- Post photos or videos of problems for visual diagnosis
- Search past discussions - your question may have been answered before
- Fastest way to get help during evenings and weekends
Email support
- For direct support, email Brett Hollifield at ke9bos@pigletradio.org
- Include details about your issue: model (Basic/Advanced), what you tried, error messages
- Attach photos if relevant (especially for hardware issues)
- Response time is typically 24-48 hours
Where to Purchase
DIY kits at vailadapter.com
- Complete kits with all necessary components and circuit boards
- Assembly required - suitable for those comfortable with soldering
- Includes detailed assembly instructions
- Most affordable option for hobbyists and tinkerers
- Choose Basic or Advanced model kit
Pre-assembled units at vailadapter.com
- Fully assembled, tested, and ready to use out of the box
- Includes latest firmware pre-installed
- No assembly or soldering required
- Ideal for users who want to start operating immediately
- Three-button add-on available separately or as a package
Additional Documentation
- Assembly guides: Step-by-step photo guides for assembling DIY kits
- Firmware updates: Web-based firmware update tool
- GitHub repository: Open-source project with all hardware designs and firmware code
Quick Reference
Mode Switching Quick Guide
To switch from MIDI mode to Keyboard mode:
- Close all MIDI programs (vailmorse.com, etc.)
- Unplug the Vail Adapter
- Wait 2-3 seconds
- Plug adapter back in
- Adapter is now in keyboard mode
To enter MIDI mode:
- Open vailmorse.com or another MIDI-compatible program
- Plug in the adapter (if not already connected)
- The adapter automatically enters MIDI mode
Radio Mode Quick Guide (Advanced)
Identifying capacitive touch points:
- Hold adapter with speaker hole facing UP and USB port facing AWAY from you
- DIT pad: LEFT side
- DAH pad: RIGHT side
To enter radio mode:
Rapidly tap DAH capacitive touch point (RIGHT side) repeatedly until tone changes
To toggle between Adapter Keyer ('K') and Radio Keyer ('R') modes:
- Hold DAH capacitive touch point (RIGHT side) for ~2 seconds
- Listen for 'K' or 'R' in Morse code to confirm mode
| Mode | Description |
|---|---|
| Adapter Keyer Mode ('K') | Adapter does the keying logic |
| Radio Keyer Mode ('R') | Radio does the keying logic |
Common Settings Overview
Key Types:
- Straight key: On/off keying, you control all timing
- Iambic Mode A: Automatic dit/dah generation, standard behavior
- Iambic Mode B: Automatic dit/dah generation, adds extra element on simultaneous release
Typical Speeds:
- Beginners: 5-15 WPM
- Intermediate: 15-25 WPM
- Experienced: 25-40+ WPM
Sidetone Frequencies:
- Common choices: 600 Hz or 700 Hz
- Range: typically 400-800 Hz
- Personal preference - choose what sounds comfortable
Settings configured at: vailmorse.com or via three-button add-on
Button Hat Summary Cheat Sheet
MODE ENTRY (hold 2 seconds):
├─ Button 1 → Speed Mode   ("SPEED")
├─ Button 2 → Tone Mode    ("TONE")
├─ Button 3 → Key Type Mode ("KEY")
└─ Buttons 1+3 → Memory Management Mode ("MEM")

IN ANY SETTING MODE:
├─ Button 1 (quick) → Increase
├─ Button 3 (quick) → Decrease
├─ Button 2 (hold 2s) → Save & exit ("RR")
└─ Wait 30s → Auto-save (descending tones)

IN MEMORY MANAGEMENT MODE:
├─ Single-click 1/2/3 → Play memory (piezo only)
├─ Double-click 1/2/3 → Record to that slot
├─ Hold 1/2/3 (2s) → Clear that slot
└─ Hold 1+3 (2s) → Exit memory mode

IN NORMAL MODE:
└─ Single-click 1/2/3 → Play memory via current output (keyboard/MIDI/radio)

TEST WHILE ADJUSTING:
└─ Use your CW paddle to test immediately!